Updating the media library
The media library is where you can find existing and add new images, video, audio files, and reports.
It is organised into folders by category, to help you find what you're looking for.
Finding an image in the media library
In the top ribbon of the CMS, click on media.
You will then have the option to choose from a number of different folders. Select the one that is of interest to you.
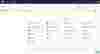
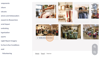
Once you have chosen a folder, you will be shown all the images that sit within that folder.
Adding an existing media file to your page
To add an existing image or video to your page, you will need to use a component that enables this (such as the media, text and image, two column, page header and hero components).
When you are populating that component, it will be clearly labelled where to add the media. Click on the + icon to navigate the media folders and add the image or video you have chosen.
Uploading new images
To upload a new image to the site, you should do this within the media library:
- Go to the media library via the blue ribbon navigation at the top of the CMS.
- Navigate to the folder where you would like the image to be saved.
- At the top of each folder, there is the option to drag and drop a file into the folder or to upload the file.
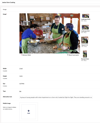
Once you have uploaded the image, you will need to complete the fields and check the positioning of the image for different formats:
- Add a name for the image in the field at the top.
- Check how the image appears in the 4 different formats and re-position it as required.
- IMPORTANT: add alt text for the image.
- You also have the option to add an alternative image to be used for mobile devices. This is optional useful when the image you've used is not formatting well on mobile screens.
Tips for adding alt text to your image
Alternative text (alt text) is an essential part of providing an accessible experience by describing what an image is showing to visitors who do not have the ability to see it. It also helps search engines understand what the page is about, so is an important part of search engine optimisation (SEO).
- When writing the alt text, consider not only what is in the image but also what is the purpose of the image or the intent behind its use. How does it add value to the content?
- Try and describe the image in a way that communicates a comparable meaning to users who cannot see the image
- Avoid simply repeating the body text of the content
- When writing alt text for images of individual people whose identity is relevant to the content, they should be named in the image.
- Groups of people in images should also be identified where their identities are relevant to the content. If they are also performing an activity or present at an event, then this information should be included.
Embedding a YouTube video
To embed a YouTube video into a webpage, you will first need to link to it from the media library.
The video tutorial below explains how to add a YouTube video to the media library and embed it into the page using the media component.
Tips for embedding a YouTube video
- The simplest way to embed a YouTube video is to create a new youtube video component with the video section of the media library.
- To embed the video, you will need the Video ID from the YouTube video
- You will find this in the YouTube url: copy the string of characters after the = symbol. This is the video ID.
- For shorts, you will need to copy the string of characters after https://www.youtube.com/shorts/
Uploading a report
Reports sit within the media folder, within the 'Reports' folder.
When uploading PDF reports, we recommend also making an accessible word version available too.
The video tutorial below explains how to add a link to a report into a webpage.
-
Media library
-
Images
-
Alt text
-
Videos
-
Reports
- Media library
- Images
- Alt text
- Videos
- Reports